
Our Instabind product has a number of creative uses our customers write to tell us about, including crafts, classic car restoration and even yacht remodeling, but the #1 use for Instabind is, of course, rug binding. It’s a great way to make a carpet remnant into an area rug. You don’t even have to be a carpeting professional to do it! Instabind makes rug binding into a fun weekend project for any DIYer or crafter.
Turn a Carpet into a Rug
How do you turn a carpet remnant into a rug? It’s simple.
Step 1
Assemble your tools. These will be a hot glue gun, scissors, and clear tape.
Step 2
Trim off any strings or irregularities along the sides of the carpet and make sure that its sides are straight. You may find using a carpet cutter and straight edge helps.
Step 3
Take the style of binding you’ve chosen to complement the carpet and make a clean cut. There are so many colors and styles of Instabind available, including:
- Regular binding style
- Cotton binding style
- Synthetic serge binding style
- Cotton serge style
- Cotton rope style
- Rope edge style
- Outdoor marine style
- Faux leather style
- Fringe style
We even sell an Instabind Starter Kit if you’d like to try your hand at carpet binding with a number of projects and styles. Our rule of thumb for selecting a binding is: if it’s a cotton or wool rug or carpet, use a natural (cotton) binding or serging style. If it’s a synthetic rug or carpet, use a synthetic binding or serging style. Of course, the highest quality look will still be the cotton one, but our synthetic binding will look great too.
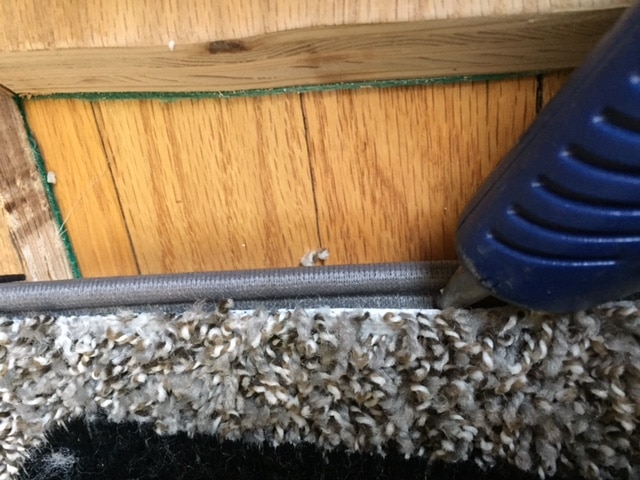
Step 4
Pull back the paper on the binding and begin applying it to the carpet in the middle of one cut edge. Extend the Instabind past the corner of the carpet, and using the corner as a guide, snip the flat part of the Instabind, stopping at the piping. With the paper turned back, overlap the backing while rounding the corner. Continue around the carpet until you return to the beginning. You can readjust if necessary at this stage in the project. Using your starting point as a guide, make the finishing cut with your scissors and trim any excess strings.
Step 5
Seal the beginning and ending pieces of the Instabind together with a bead of hot glue. Now apply a ⅛” bead of hot glue between the edge of the Instabind and the carpet and hold in place a few minutes to let the glue set. Continue this process all the way around the carpet. For a more finished looking back, trim the Instabind backing at a 45 degree angle.
Step 6
Place your beautiful new bound piece of carpet in any place it complements your decor.
Transform Your Rug with Instabind
If you have a rug you’d like to repair, or a remnant piece of carpet that could serve as a rug, what are you waiting for? Using Instabind to transform either is much less expensive than the price of an area rug, even an inexpensive one, so what have you got to lose?